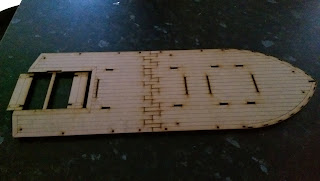
I got this kit close to a year ago at the same time as the one below, as I don't have any experience with MDF kits I build the smaller one first & have to say it was a dream to put together.
Here's a link to both kits https://www.sarissa-precision.com/Boats___Launches/cat1603369_2504956.aspx
So full of confidence it was time to start the big one, well what could possible go wrong ?
Well how about this, you might need to click on the pictures to enlarge them to see the problem, but the plans don't match up with the parts that make up the as you can see from the picture below :(
Not the start I was looking for,all the pieces in the picture above are in two parts, but if you look at the plan & the plan above then don't match, this then had me wonder which piece should go where.
When in doubt do a dry run, so happy that I'd worked out which way then went together I set about gluing them up.
Tip when doing this use the cabin parts to make sure there lining up correctly & be careful to try not get any glue into any of the little holes as that could cost you problems later.
With the base completed I laid a couple of heavy books on it & left it over night to set, make sure your doing this on a flat surface, you notice there a little notch at the very front of the boat were a part is meant to be glued in at this point, I've left it out & will explain later why.
Tip while your waiting on the base to set you could if you wish start work on the upper part of the boat but I didn't, anyway time to carry on with making up the rooms, tip make sure to clean up any glue as you go, I find a wetwipe that used for clean around the house works well for this.
Rubber bands to hold the room together while the glue sets is useful, try to pick a band that is not to tight.
Tip as you can see in the picture above the back part carries out, so you'll need to put the rubber band on this piece before you put it in place, (see below) & cut it off later.
After the bad start I have to say that things where going nice & smoothly, the only grip would be that none of the parts are numbered.
With the main part of the lower section build it was time to start what I always think of as the fiddly bits, why is there always fiddly bits ? :)
Now its says to make these up, but if that means in place or make them up & then put them in place I couldn't say.
Anyway I made them up in place.
Next up was the wheel.
Then the handrails, tip slide the handrail in until it nearly in place then put a dab of glue on the two ends.
If you remember earlier I said there was a piece that was to be glue to the front, time now to look at that
Its a little part that goes in here & at the time I didn't think it was going in correctly, now if this was a mistake or something I did wrong I can't honestly say, so if anyone reads this that build this boat they might let me know in a comment.
I'd to do a little pairing on the slot on the front of the boat & cut the notch in the piece in the picture above to make it bigger, sadly I didn't think to take a picture before doing this to show you, but if you click on the picture above you might be able to see what it looked like on the plan.
Anyway this worked & I glued in the two card panels, this completed the lower section of the boat.
The upper section went together with no problems.
Tip before putting in the handrails put the roof part on (Don't glue it), there are two reasons for this one it will keep the up rights in the right place & it will make it easier to slid in the handrails.
Finial thoughts, a very nice model that went together very well after a dodgy start, with the only problem been the piece at the front, the only dislikes I have are the card funnel which I'll replace with a plastic one & from a gaming point of view that there is no stairs from the lower deck to the upper one, now for the fun part painting this thing :(
That's a rap for this post, as always my thanks for dropping in & if you care to leave a comment it would be welcomed :)


